Thursday, July 28, 2011

Export Rib 3x3. The Breakdown.

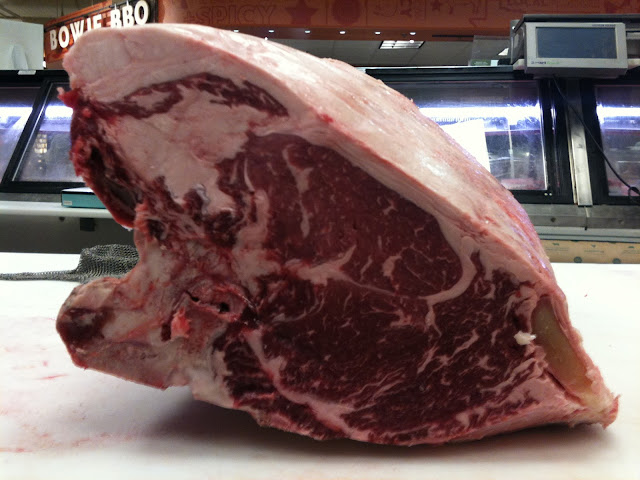
Chuck-End portion of a 3x3. A 3x3 is a Bone-in Rib Roast that still has the Chine bone.
As you can see, there's a hefty amount of fat covering this Primal. 

Loin-End portion. The Fat covering this primal will protect it during the aging process.
At Whole Foods Market, we age meats for no less that 14 days. 

This particular piece isn't going into the Dry Age Cooler, rather, I needed
some Boneless Ribeyes in my case. The first step for breaking this guy down is cleaning
it up a bit. Clear away bulk fat to give yourself a better understanding of where the
bones are. 

The first incision is right along the animal's spine. You'll
need to flex your blade into these bones a bit to keep the muscle
intact. 


As you can see, we're making some progress now. 

I've always called this bit of tendon 'bubblegum'. You can peel it off with your
fingers

Now that the first side of the 3x3 is cleaned up, turn the 3x3 over and
focus your attention on the ribs. Starting at the 12th rib, ease your knife down into
the meat, working around the bones, across the roast. This may take three or four revolutions
to finish, so take your time!


Looking down into the meat. 

Now that the ribs are removed, it's time to clean around the vertebrates. 

From one side of the rib to the other, guide your knife around any bones still
holding onto the meat. 

Fully removed. 

Cross section of the Rib

Case Ready Ribeyes.

Tuesday, July 19, 2011

Steamship Round. The Breakdown.

This is a Steamship Round. The Round is the hind leg of the steer. From this primal comes the
Top Round (London Broil), Eye of Round and Bottom Round Rump. The primal usually weighs around 60#. 

This bone is the animals femur, making the the steer's thigh.

To remove the femur, start by making an incision along the outline of the first side of the bone with the first inch or so of your blade. 

Once the first side of the bone is released, you'll be able to manipulate the position of it to allow
your knife to reach underneath the bone. 

Once you have a good start on the first side, switch over to the opposite side and begin repeating the process.

To get in and around the high-side of the femur, start at the base and free the bulk of it. 

Once you've gone around the top of the bone, you will be able to free a larger portion, allowing you to increase the
angle of the femur further and further.

As you work down towards the shank, keep lifting the femur upwards as this motion should be relatively fluid. 

Almost done!

Just a little bit more!

Finished! Remove any meat that might remain on the femur for trimmings. 

The next step is removing the Top Round. As this is butchering, the goal is to avoid cutting into any muscles, instead you will be separating them into their respective sub primals. 

As you continue working this seam, the weight of the Top Round will work to your benefit and acts as if it wants
to be free from the remaning Gooseneck (Subprimal including the Eye, Rump and Pike's Peak).  Also in this style of butchering you will be using your cutting hand just as much as your other hand; Pulling and knifing at the same time. 

As you work your way down you can see how the muscle previously fit together, as well as being able to see where you
need to go next. 

After a certain point, the Eye of Round becomes visible and the Top Round is almost completely removed. 

Done! Set your Top Round aside and make room for the process of removing the Eye of Round. 

Another perspective of the Femur, Gooseneck and Top Round. 

To locate the seam connecting the Eye to the Rump, glide your knife along the top of the Eye. This will expose the Eye
as its' own muscle and provide you with the proper path of removing it. 

Again, as you continue to make progress you can see clearly the muscles' shape and size easily. 

Can you see the Eye of Round? Look closely, it's the long narrow muscle in the center of the picture. 

A continued perspective on how the muscle fit together. 

The next muscle grouping to me removed has many names and uses. Some folks call it Boneless Shank; The Rat; Lean Trim. Far fewer folks turn this into a Pike's Peak roast, which we'll see soon.

Starting from the top of the Rump, this grouping begins as a large, inedible tendon. 

In the same fashion as removing the Femur, start at one end and work your way down using both hands effectively to make this process fluid. 

Almost there!

Finished! You now have four out of the five muscles that make up the Round (missing is the Knuckle, or Sirloin Tip - removed at slaughter for packaging reasons). 

Now to tackle the Top Round.

I start by clearing away some of the bulk fat to help visualize the shape and outline of the meat. 

Up until now, the only knife I've been using has been a flexible six-inch boning knife. For use in trimming larger primals
such as this one, an eight-inch breaking knife will be much more efficient and comfortable. 


Excess fat removed, it's now time to break down the meat. 

Remove the grey-ish section of meat first, this is caused when the Primal was vacuum-sealed; discard this section. 


There is a Cap on the Top Round that is easily located, remove this. 

As you're peeling the cap back, continue assisting the process with your knife - As with removing the Femur, you'll only be using the tip of your blade. 

This cap incases the Top Round from the top, all the way around to the side. 


Working your way down, now. 

Follow the seam until the cap is removed. 

Face your roast perpendicular to the grain. 

There is a vein and some Silver Skin that should be removed from the bottom of the roast, once completed the Primal is finished. Now you can cut steaks, roasts, lean stew, etc. 

Now for the Rump (Bottom Round). 

There is a large tendon on the Silver-Skin-side of the roast, remove and discard. 

Remove the heavy Silver Skin, there will be some meat remaining on it that you'll need to clean off but the time it takes to cleanly remove the s-s is greater than the time it takes to clean it. 

The Eye of Round doesn't require much explaining, just removed the fat it's incased in, leaving you with and extremely lean roast that's perfect for making lunch meat and beef jerky. 

Opposite side. 

Now for the Pike's Peak roast. As you can see, this primal is ugly and if you intend to retail it as a roast it requires a lot of work. Some folks don't retail this cut as it is great to use in the grinds but I'd rather retail every muscle possible!

Remove all outer fat and silver skin. 


Once the top of your roast is clean, flip it over and focus on the bottom. 

Do you see the high concentration of Silver running through the middle? That's what referred to as the rat, remove this. 

In a 'rolling' motion, peel the rat out with your left hand, using your knife to separate. 

Almost done!

Once removed you can return your focus in the Pike's Peak. Remove the heavy silver skin and roll the roast once you've completed cleaning it. At this point you can tie and retail your roast. 

Cleaned and rolled. 

And you're finished! All in all, this took me roughly 30 minutes, cleaning up my mess probably took longer than creating it!


As always, THANK YOU for your sustained interest in butchery and the work I'm doing with this blog. I hope you've enjoyed!

-Reece