Tuesday, November 15, 2011

Whole Chicken. The Breakdown.

Alright.. I feel like it's been a long time coming for a how-to on whole chickens, so here we go! 

The first step is cutting off the wings. This hen is currently 'under arrest' so release the wings and begin by moving the joint around to get an idea of where the wing is attached to the rest of the bird. 

Once you found the joint, cut down into it to expose the connection. 

Using the tip of your knife, work your way around the drum of the wing while pulling the wing away from the bird. 

Hanging on by a thread. 

Repeat this process for the second wing. 


After the wings are taken care of, direct your attention to the legs. The first step in removing legs is simple. Make an incision into the loose skin between the leg and breast. 

Tear the skin to free the Leg from the rest of the bird. 

Grab the leg by the thigh and force the thigh-bone out of the joint. You'll hear a 'pop'. 

Pressing your knife against the carcass, work your way through the meat - obviously leaving as little as possible on the back - until you reach, and break, the cartilage that connects the thigh to the back. 

Once that cartilage is broken, you can pull the rest of the leg off.. If you do this correctly, the oyster from the thigh that rests on the back will remain on the thigh. 

Cut the skin to finish out this step. 

Repeat this process for the other leg. 


A perspective of the back, legs and wings removed. 

A perspective of the breast, wings and legs removed. 

To separate the thigh and drumstick, manipulate them until you have a bearing on where the joint is and cut through. Your knife should glide through this meat effortlessly. Ideally you will be cutting through meat and cartilage, if you run into bone, just force your knife and repair it later. 


Take your knife and cut the flaps of tissue that connect the breasts from the bottom of the back. 

Place the chicken neck-side-down. This step is unbelievably simple once you've figured it out however, until you do you will make it harder than hell. Place your knife on the outer side of where the oysters were, dig in a little bit until you get to the ribs and force your knife down through them until you reach your block. 

Repeat this process on the other side of the back. This is what your two primals should look like. 


To remove the keel bone, make a shallow incision through the cartilage at the top (neck/head-side) and continuing  down the length of bone. This is the first step of separating the two breasts. 

I use my thumb to split the keel bone from either side of the breasts. 


A bare keel bone. 

Once the keel bone is removed, cut through the wishbone and separate the two breasts. 


That small red dot in the middle of the meat is part of the wishbone. 

slide your knife under the wishbone to clear it out of the way. 

Using the tip of your knife, cut the ribs away from the breast. 


Now we're going to make some boneless skinless thighs. 

Cut the meat away from both side of the thigh bone, once you can get your knife around the drums...

... bend the meat backwards to force the bone outwards. Slide your knife down the length of the bone until you reach the block. Remove the skin and you're done!


As an added bonus, I'm going to quickly show you how to make Airline Chicken Breasts. 

Halve the chicken, separating the white meat from the dark meat. 


You'll cut away the skin and tissue connecting the two halves and break the back at the beginning of the ribs. 

Starting at the upper back, near the wings, start scraping away the scapula until the 'shoulder blades' and wing joints are exposed. 

Once the wings are removed from the carcass, start pulling away the carcass while knifing any tissue that connects the meat to the bone. Working your way around the wishbone is probably the hardest aspect of doing this. 

Once the ribs are cut away and all that's left connecting the carcass and the meat is the keel bone, peel the carcass back to expose the boneless breast. 


And there you have it, a forgotten cut from a time when airlines still served proper food. Airline Chicken Breasts. 

How-to: Canadian Bacon.

In this recipe, lean is king. Canadian Bacon recipes call for all fat and sinew to be removed, so when shopping for the Pork Loin, I looked for the one with the most fine-grain marbling I could find. This view highlights the end of the Rib-eye section of the loin and the beginning of the Center-cut section. At the top right of the muscle, you can see the end of the Rib-eye's cap-muscle. 

This view shows the center of the loin, the cap off fat on top is beginning to dissipate, as well as the kernel. 


For the first step, turn the loin over with the Rib-eye section facing you. You can simply peel the cap and kernel away from the loin with your fingers. 

Any connective tissue is easily broken. 

Once you've peeled the majority of the cap off, you can roll the loin away from the cap. 


Once you've removed the cap, save it for later - You can make Salt Pork, or save for making Sausage. 

The second layer of tissue to be removed is almost as simple, but may require a knife. This kind of trimming utilizes a sort of pushing motion, you don't want to cut into the meat, but you're trying to take off the fat and silver skin in one piece. 

Now that the Loin is left fairly bare, the next step is going to be removing the heavy silver skin from the top of the Loin. 

In portions of an inch or so wide at a time, slip your knife in and push forward while tilting your knife slightly upwards. The idea here is to get all the silver off without cutting into the meat. 

Long knife strokes aren't the easiest but are absolutely worth practicing. 

Now we have an entirely lean Pork Loin. 

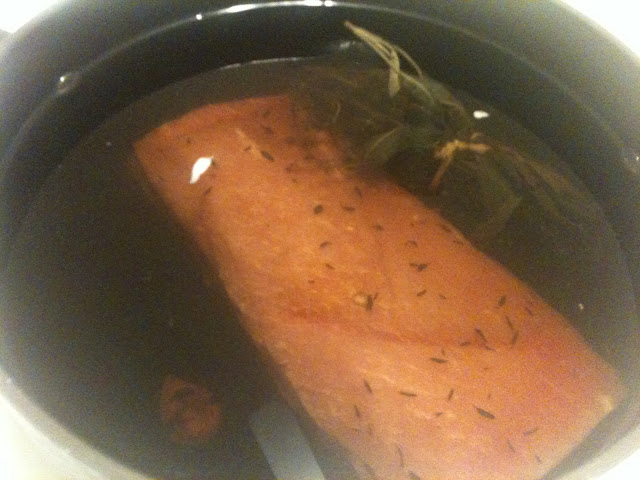
Now it's time to make the brine. Warm a gallon of water on the stove. While your water is warming, weigh out a cup and a half of Kosher salt, 1 cup sugar and 1 ounce Cure #1 (Sodium Nitrite). Tie together a bunch of Thyme and a bunch of Sage and smash a handful of Garlic Cloves. Add these ingredients to the warmed water and stir until Salts and Sugar are dissolved and the mixture becomes aromatic. Remove from heat and let to come to room temperature and then chill in the refrigerator. DO NOT put the Loin in until the brine's temperature is below 40F. You do not want the brine to cook the meat!

Submerge the loin completely, weigh down with a plate and refrigerate. I allowed the Loin to brine for a little less than 3 full days. 

Remove the loin from the brine and rinse off thoroughly and discard the brine. 


Once you've rinsed the Loin off, pat dry with paper towels and refrigerate uncovered for a day (or two). 

I didn't want the Loin to be overly smoky, so I only smoked it for an hour and a half, then finished it in a 225F oven. Once the meat reached 150F I pulled it out, cut some up for my friends and refrigerated the rest. I feel the need to say that this was one of the best tasting and most enjoyable recipes I've recreated and I would definitely recommend you try this at home!